How to Enable Internet Connection Sharing (ICS) in Windows 7?
In Small Office/Home Office (SOHO) scenarios or in homes where more than one or two computers are present it becomes mandatory to share a common Internet connection between all of them. Many people think that this task is complicated and should be performed only by a certified professional. But in many cases this is not true at all. Sharing an Internet connection between 2 to 3 computers is quite easy and does not require a highly qualified professional to do so. However there are few prerequisites which are to be fulfilled before you can configure Internet Connection Sharing on your Windows 7 computer. Below is the list of them:
Prerequisites:
- You should have at least two network interface cards present on your computer. One connected to the Internet and other connected to either other computer directly or to an ethernet switch or hub.
- If you are trying to share your Internet connection between more than two computers you should have an ethernet switch or hub.
- You should have ethernet cable of appropriate length. If you are using wireless medium you should have appropriate Wireless Access Point (WAP).
Once you have collected and connected all the above devices you can follow the steps given below to configure ICS on your Windows 7 computer.
-
Click on Start button.
-
At the bottom of start menu in the search box type ncpa.cpl and press enter key.
-
On the Network Connections page right click on the LAN card which is connected to the Internet and from the context menu select Properties.
-
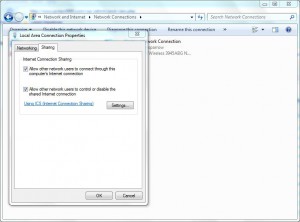
In the Local Area Connection Properties box go to Sharing tab.
-
Under Internet Connection Sharing category select Allow other network users to connect through this computer's Internet connection radio button to enable ICS and click on Ok button to accept and confirm your selection.

Best Practices:
To avoid confusion always rename the LAN cards by right-clicking on them and from the context menu selecting Rename option. LAN card which is connected to the Internet should be renamed as INTERNET or PUBLIC and the other one which is connected to local area network should be renamed as PRIVATE or LOCAL AREA NETWORK.
Note:
Make sure that the other LAN card and all other computers which are connected to Local Area Network are configured to obptain IP address from DHCP server (default configuration).