How to Install DHCP Server in Windows Server 2003?
To use any feature in Windows Server 2003 you first need to install the services and then you need to configure it to make it up and running. Same is with DHCP Server. Installing and configuring DHCP server services in Windows Server 2003 are two different processes. This section is precisely dedicated to the process involved in the installation of DHCP server.
In order to install DHCP server in Windows Server 2003 you need insert Operating System installation disc in the CD/DVD ROM drive and then follow the steps below:
- Click on Start button.
- From the menu go to Control Panel and from its sub-menu select Add or Remove Programs.
- From the opened window click on Add/Remove Windows Components button present in the left bar of the window.
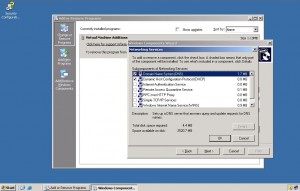
- From the Windows Component Wizard box click on Networking Services (do NOT check the check box) and click on Details button.
- On the Networking Services box check Dynamic Host Configuration Protocol (DHCP) check box and click on Ok button.
- Back on Windows Components Wizard box click on Next button to start the installation process.
- On Completing the Windows Components Wizard page click on Finish button and close Add or Remove Programs page.

More Info:
DHCP server is used to assign automatic IP address to the client machines which are configured to obtain IP address automatically (default configuration). When a client machine boots it requests an IP address from DHCP server by sending DHCP Discover packet. DHCP server then replies by offering an IP address to the client through DHCP Offer packet. In return client machine requests DHCP server to assign the offered IP address to it using DHCP Request packet and finally the DHCP server assigns the address to the requesting client machine and sends and acknowledgment through DHCP Acknowledge packet. This entire process is known as DORA.
Previous: Free Time Tracking For Windows