How to Remove Pictures Folder from Start Menu in Windows 7?
In any production environment administrators never want users to use office computers for their personal works and multimedia purposes. This is the reason why most of them apply various security measures either on every computer (in workup environment) or through domain group policies settings (in domain environment). By following the steps given below you can remove Pictures folder from the start menu so that no user can save his/her personal pictures on a Windows 7 computer.
- Logon to the computer using administrator account.
- Click on Start button.
- At the bottom of start menu in search box type gpedit.mcs command and press enter key.
- From Local Group Policy Editor snap-in under User Configuration expand Administrative Templates and from the list click on Start Menu and Taskbar.
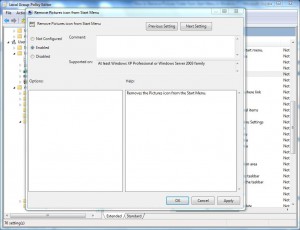
- From the right pane double click on Remove Pictures icon from Start Menu.
- On Remove Pictures icon from Start Menu box select Enabled radio button and click on Ok button to accept and confirm your configuration.
- Close Local Group Policy Editor snap-in and open Command Prompt.
- On the opened command window type gpupdate /force command and press enter key to update your computer with latest configuration.
- Close Command Prompt.

More Info:
In order to bring Pictures folder back in start menu you need to follow all the above steps except clicking on Disabled in step 6.