Save NVRAM as Separate File in GNS3
While saving configurations in NVRAM of any Cisco device say router or switch in physical devices the things are prearranged are easily done as everything is real and tangible. However when talking about GNS3 just like all other virtualization applications all the hardware which virtual devices consider as physical devices are actually the files for physical computers. Same is the case with NVRAM of any virtual Cisco device used in GNS3. This means that NVRAM which GNS3 virtual devices considered as the physical ones are the files to the physical computers and therefore can be saved separately. These files can then be imported to any other virtual device as required. You can allow GNS3 to save NVRAM of virtual Cisco devices as separate files by following the steps given below. This configuration should be done when GNS3 application is started and/or when user wishes to create a new project.
-
Logon to the computer on which GNS3 is installed and start the application by double-clicking on its icon.
-
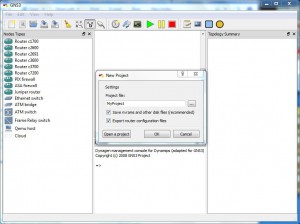
Once the application is initiated you will be displayed with New Project dialogue box.
-
Type the name of the project in the appropriate field and check Save NVRAMs and other disk files (recommended) and Export router configuration files checkboxes.
-
Click on Ok button once done to create a new project.

Note:
Configuration files will be saved at the default location or the location which is manually specified by the users.