Change Default Download Location of BitComet in Windows 7
When BitComet is installed and configured on Windows 7 operating system its default download directory is C:Downloads. This means that all the downloaded files will automatically be saved in the specified location. Many home users do not change this specification normally and the result is that they end up with overpopulated system drive which may reduce both performance and speed of the computer. When this happens users rush for computer engineers who charge a decent amount from them to rectify the problem. Most recommended solution however in these cases is that users should change the default download directory so that the system drive is left free and the downloaded files are stored to any other drive. As a BitComet user in Windows 7 if you want to change the default download directory of the application you can follow the steps provided below:
-
Logon to Windows 7 computer on which BitComet application is installed.
-
Double-click on the icon of the application to initiate it and get its interface.
-
From the menu bar click on Tools menu and from the available list of options point to Default Directory.
-
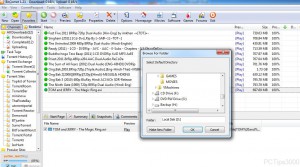
From the appeared submenu click on Other Directory and on Browse For Folderbox browse for and locate the folder in which you want to save all the downloaded files.
-
Finally click on Ok button to save the changes that you have made.
