Disable System Restore in Windows 7
Feature of system restore was first introduced in Windows XP which helped users to restore the states of the computers in case any disaster occurred to it. System restore feature captures the image of the running state of the computer. The operating system measures the running state by the successful logon duration and time. This means that whenever a computer successfully starts the operating system captures the image of the state store it in its memory. Whenever the disaster occurs users are able to restore their computers from the previously saved state. This configuration is now carried forward on to Windows 7 with some new advanced features and with the ability of disabling this feature at all. As a Windows 7 user if you want to disable system restore feature you are required to follow the steps given below:
-
Logon to Windows 7 computer with administrator account.
-
Click on Start button and from the available list click on Computer option.
-
From the available menu click on Properties.
-
On the opened window from the left bar click on System protection link.
-
On System Properties box make sure that you are on System Protection tab.
-
Under Protection settings list select the desired drive partition on which you want to disable system restore and click on Configure button.
-
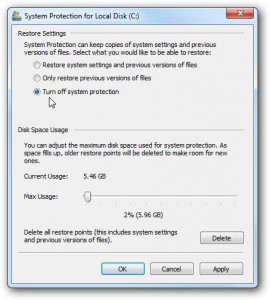
On the opened box select Turn off system protection radio button and click on Ok buttons on all the opened boxes to save the changes.