Easily Share Printers in Windows 7
Installing shared printers on every computer of the network might be quite hectic for both administrators and users. In earlier days administrators used group policies to configure startup/shutdown or logon/logoff scripts to deploy shared printers to the computers and/or users automatically. This practice required batch files to be created and commands to be written to solve the purpose. However in Windows server 2008 and Windows 7 operating systems Microsoft has integrated a new group policy feature named Deployed Printers in order to reduce administrative overhead and expedite the printer deployment process. As an administrator you can deploy shared printers automatically throughout the network with single configuration by following the steps given below:
- Logon to the computer with administrator account and in the search box available in start menu type gpedit.msc and press enter.
- In the opened snap-in under Computer Configuration expand Windows Settings.
- From the expanded list right click on Deployed Printers and from the appeared menu choose Deploy Printer option.
- On Deploy Printer(s) box click on Browse button to locate the shared printer available anywhere in your network and once found click on Add button to add the printer to the list.
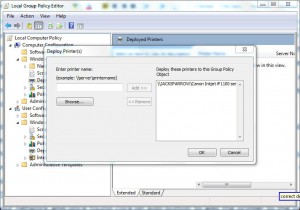
- Once done click on Ok button to accept the configuration and finally close the opened snap-in.
- Use gpupdate /force in command prompt to update your computer settings with the latest configuration.

Note:
This policy configuration can be exploited best in client server architecture where entire network infrastructure is centrally managed.