Enable Network Access for Administrative Shares in Windows 7
In older versions of Microsoft's operating systems accessing any shared folder was quite simple. However with the simplicity also came the risks of sensitive information getting stolen. Since Windows 7 and Windows Vista are the operating systems which are considered to be highly secured as compared to the legacy versions Microsoft has integrated another security measure to harden the layers of security in the operating system. By default administrative shares cannot be accessed when Windows 7 or Windows Vista is installed on any computer. In order to make administrative shares available to the users across the network you need to follow the steps given below:
- Logon to your Windows 7 computer with administrator account and click on Start button.
- At the bottom of start menu in search box type regedit and press enter key to open Registry Editor.
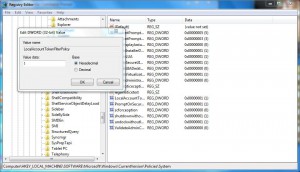
- On Registry Editor go to: HKEY_LOCAL_MACHINESOFTWAREMicrosoftWindowsCurrentVersionPoliciesSystem location.
- In the right pane right-click anywhere and point to New.
- From the appeared submenu click on DWORD (32-bit) Value and type LocalAccountTokenFilterPolicy as the name of the new entry.
- Once done double click on the newly created entry and from the opened box in Value data text box type 1 to enable administrative shares.
- Click on Ok button to confirm your settings and restart your computer to allow the configuration to take effect.

Note:
You need to go through the above steps on all the computers on which you want to enable administrative share.
Previous: Backup Registry in Windows 7