How to Create a System Image in Windows 7
In earlier days creating system image was a tedious and hectic task which only administrators were allowed and supposed to do. Because of the complications involved in creating the system images home users always used to avoid the process and they normally used to go for a professional service engineer in case their system came across any troubles. With the release of Windows 7 Microsoft has made things easier for home users and now with just a few clicks users can create their own system images which they can use to restore the operating systems if something goes wrong with them. Although the steps involved in the process are very simple administrative privileges on the computer are still required to complete the task successfully. As a Windows 7 administrator if you want to create system image of your computer in both production and home environments you are required to follow the steps given below:
-
Logon to Windows 7 computer with any account that has administrative privileges.
-
Click on Start button and from the list click on All Programs.
-
From the new list go to Accessories container and from the available applications click on Getting Started.
-
On the opened window select on Backup your files from the options and then click Backup your fileslink that appears.
-
On Backup or store your files page click on Create a system image link from the left bar.
-
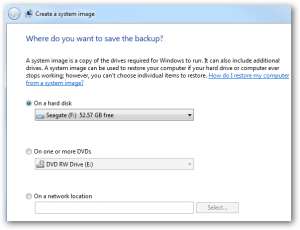
On the next page choose the appropriate storage place and click on Next button.
-
On the pages choose the drives for which you want to create images and click on Next button.
-
On the final page click on Start backup button to start the process.
