How to Disable any Hardware Device Attached to Your Windows 7 Computer?
There might be times when you need to disable any hardware device in your computer in order to protect it from any misuse. Disabling some hardware devices like CD/DVD ROM drives or USB ports on your system also prevents it from getting infected from virus attacks. If you want to enable or disable any hardware device attached to your computer system you need to follow the steps given below:
- Logon to the system with administrator account.
- Click on Start button.
- From the start menu right click on Computer and from the menu click on Manage button.
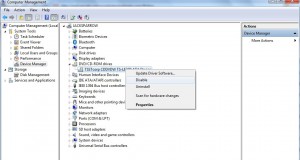
- From the Computer Management snap-in from the left pane click on Device Manager.
- From the right pane expand the category of the device you want to disable and right-click on the device (DVD/CD-ROM Drives in this example).
- From the menu click on Disable to disable the device.
- Close Computer Management snap-in

More Info:
You can reverse the above process to enable the disabled device on your computer.
Best Practices:
In production environment it is always advisable that the above configurations should be managed using Group Policies. However if this configuration is required to be done on home computers users can create batch files to automate the tasks.