How to Disable Control Panel in Windows 7?
Whether you are a home computer user or you are in an office where IT security means a lot Control Panel is the place from where any one can modify computer settings and make it vulnerable to risks. Therefore when a single PC is shared among many users it is strongly recommended that "Control Panel" should be disabled to provide an extra layer of security to the machine and data it contains. Process to disable access to Control Panel is quite simple and is given below:
- Click on "Start" button.
- At the bottom of the menu in the search box type "gpedit.msc" (without quotes).
- In the "Local Computer Policy" snap-in under "User Configuration" expand "Administrative Templates" tree and select "Control Panel".
- In the right pane double-click "Prohibit Access to the Control Panel".
- From the opened window select "Enabled" radio button.
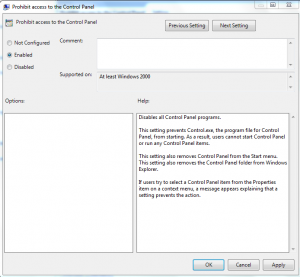
- Click on "Ok" button to accept and confirm your selection.
- Close "Local Computer Policy" snap-in.
- Click on "Start" button and go to "All Programs".
- From the list select "Accessories".
- Right-click on "Command Prompt" and select "Run as Administrator".
- In the "User Account Control" dialog box click "Ok" button to allow Windows to use your administrative credentials to run the program.
- In the "Administrator: Command Prompt" window type "gpupdate /force" (without quotes) and press enter key.
