How to Specify a Roaming Profile Path for All Users in Windows 7?
In earlier days configuring a roaming profile for all users in a single go was only possible in active directory domain environments. However with the latest amendments in Windows 7 setting roaming profile path for all users in a single go is possible on a computer that is part of workgroup as well. In order to configure roaming profile for users on a Windows 7 computer it is essential that you have another computer connected to the network and that computer must have a shared folder that can be accessed from anywhere. Once these prerequisites are met you can configure roaming profiles for all users on a Windows 7 computer by following the steps given below:
- Logon to the computer with administrator account.
- Click on Start button.
- At the bottom of start menu in search box type gpedit.mcs and press enter key.
- On Local Group Policy Editor snap-in under Computer Configuration expand Administrative Templates and expand System.
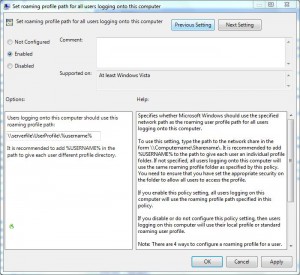
- From the list click on User Profiles and from the right pane double click on Set roaming profile path for all users from logging onto this computer.
- On the opened box select Enabled radio button and in the Options pane specify the roaming profile path (which is the network path of the shared folder on the other computer AND is connected to this computer via local area network connection followed by the variable to create user specific folder e.g. \FILESERVERSHAREDFOLDER %USERNAME%.).
- Once done click on Ok button to accept and confirm your configuration and close Local Group Policy Editor snap-in.
- Open Command Prompt and the command window type gpupdate /force to update your computer with latest settings.
- Close Command Prompt.
