How/Why to Disable DHCP and NAT Feature in VMware Workstation?
In case you want to map your virtual machines created in VMware with the physical machine so that it can interact with the rest of the physical network you need to configure virtual LAN card of the VM to the bridged network. However if DHCP and NAT feature is enabled (which by default is enabled) the guest operating systems installed on the virtual machines will start receiving the IP addresses automatically from the DHCP feature provided with the application. In case you have a dedicated DHCP server available in your network you need to disable DHCP feature in VMware so that virtual machines can get the IP address from your DHCP server and can then communicate with the physical machines of the entire network. You can disable DHCP and NAT in VMware workstation by following the steps given below:
-
Open VMware console window by double-clicking on the icon on the desktop.
-
On the main window in the menu bar click on Edit and select Virtual Network Editor option.
-
The operating system might ask for User Account Control approval which you can allow by pressing Yes button.
-
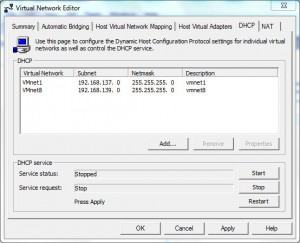
On the opened box go to DHCP tab and click on Stop button.
-
Click on Apply button to make the changes permanent and go to NAT tab.
-
Click on Stop button and then click on Apply button to make the changes persistent.
-
Finally click on Ok button and if required restart the VMware.
