Backup a Windows 7 Computer
Nowadays backup is an essential part of any IT oriented organization and this custom is now also been carried forward to home users as well. In other words every individual whether in home environment or production area is now conscious and always tries to create backup for the data that is stored in his/her computer system. With the release of Microsoft Windows 7 backup process is now even simpler and it does not require any technical skills which indeed is a great advantage for home users. However Windows 7 computer requires a few steps to be taken for the backup process and its scheduling. As a Windows 7 user if you want to set your Windows up for backup you are required to follow the steps provided as below:
-
Logon to Windows 7 computer with administrator account.
-
At the bottom of start menu in search box type Backup and Restore and press enter key.
-
On the opened window click on Set up backup link.
-
On the next page choose the location where you want to store the backup. Alternatively you can click on Save on a network button to specify a network location for storing backup and click on Next button.
-
On the next page choose appropriate radio button specifying what data is to be backed up and click on Nextbutton.
-
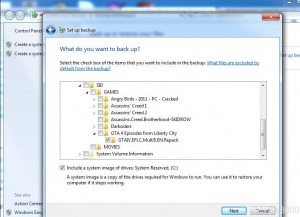
On the next page choose the data that is to be backed up by checking the check boxes representing them and click on Next button.
-
On Review your backup settings page click on Save settings and run backup button to start the process.
