Customize Send To Menu in Windows 7
When a Windows 7 user right clicks on any object in the context menu Send To option is also available which allows users to send the copy of that object to the available options in the submenu. The submenu is by default created during the installation of Windows 7 operating system and normally it provides sufficient destinations to send the object. However administrators can customize the options available in Send To submenu to add or remove the destinations as required. As an administrator if you want to do so you need to follow the steps given as below:
-
Logon to Windows 7 computer on which you want to customize Send To menu with the account that has administrative privileges.
-
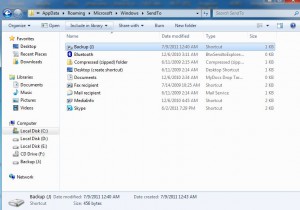
Use Windows Explorer to locate **C:UsersUsername**AppDataRoamingMicrosoftWindowsSendTo path.
-
Right click on the destination location object which you want to add to Send To menu in another Windows Explorer Window and create its shortcut on the desktop.
-
Now copy the shortcut from the desktop and paste it to **C:UsersUsername**AppDataRoamingMicrosoftWindowsSendTo location.
-
In some cases it might be required to restart the computer to allow the changes to take effect.
-
You can test this by right clicking on any object and going to Send Tooptions to find the submenu with added entry.

Note: If you want to remove the added destination you just need to delete the shortcut from the above mentioned location.