Enable BitComet Download Speed Scheduler in Windows 7
There are several reasons because of which BitComet torrent client application is considered as one of the best downloader around the globe. One best reason along with all others is that users can schedule the download speeds according to the days of the week and time. Downloads can be scheduled on high-speed low speed and turn off downloading bases and this configuration is quite helpful for the users who have limited Internet connection bandwidth and that too for a limited time period. In order to schedule the download limits users are required to first enable the scheduler. As a BitComet users in Windows 7 if you want to enable download scheduler you are required to follow the steps provided as below:
-
Logon to Windows 7 computer on which BitComet torrent client application is installed and to initiate its instance you need to double click on its icon available on the desktop.
-
From the opened interface go to Tools menu and from the available list of options click on Options.
-
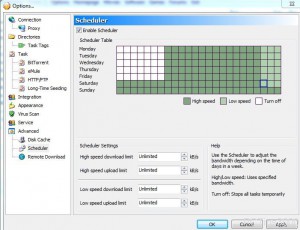
On the opened box click on Scheduler under Advanced category from the left pane.
-
From the right pane check Enable Scheduler checkbox available at the top of the pane.
-
You can now click on enabled boxes under Schedule Tablecategory. You can click the boxes several times to change their values.
-
Once done click on Ok button to save the changes.
