How to Capture the Image of a Windows 7 Computer Using Acronis True Image?
Acronis True Image is an imaging software using which you can capture the image of an installed operating system. The benefit of this is that if because of any reason your hard disk or system drive crashes or operating system gets corrupted you can restore the captured image using this software. The entire restoration process will take not more than 10 to 15 min and you will get the fresh operating system up and running on your computer. To capture the image you need to have a bootable media of Acronis True Image which can easily be obtained from the Internet. Alternatively you can purchase the software and install it on your Windows 7 computer. After installation you can use a wizard provided by Acronis to create a bootable media. Acronis True Image has two flavors designed for both corporate and home environments. Assuming that you are using Windows 7 Acronis True Image Home is used here. Below are the steps which will tell you how to use a bootable media to capture and/or restore Windows 7 image on a computer.
- Configure your computer to start from bootable CD/DVD.
- Insert Acronis bootable media CD in the CD/DVD drive and boot your computer with it.
- On the first page click on Acronis True Image Home (Full Version).
- If you want to take backup of your computer you need to click on Backup link provided on the opened page.
- On Welcome to the Create Backup Wizard page click on Next button.
- On Select Backup Type page make sure that My Computer radio button is selected and click on Next button.
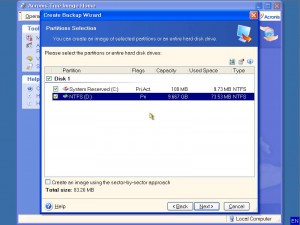
- On Partitions Selection page select the partition that contains the operating system (in most cases it will be D:) and click on Next button.
- On Source Files Exclusion page leave everything as default and click on Next button.
- In the Information box read the information carefully and click on Ok button.
- On the Backup Archive Location page select the location where you want to save the backup file and type the name of the file and click on Next button.
- On Select Backup Mode page ensure that Create a new full backup archive radio button is selected and click on Next button.
- On Backup Creation Options page provide password if needed and click on Next button. (Password is optional)
- On Archive Comments page type any comments or else you can leave it blank and click on Next button.
- On the next page click on Proceed button to start image creation process.

Click here to view video tutorial for How Acronis True Image Home Works?
Click here to view video tutorial for How to Install Acronis True Image Home?
Click here to view video tutorial for How to Capture and Restore System Images using Acronis True Image Home?
Click here to view video tutorial for How to Create and Use Acronis True Image Home Rescue Media to Capture and Restore System Images?