How to Configure DHCP to Provide Automatic IP Addresses in Windows Server 2003?
DHCP server is a computer that assigns automatic IP addresses to the client computers which are configured to obtain IP addresses automatically. Before DHCP server starts assigning IP addresses to the client machines it has to be configured after it is installed. If you want to configure DHCP server first of all you need to create a new scope so that it can provide IP addresses from its address pool. This configuration is quite simple however in complex network scenarios complex DHCP configuration can be done to exploit its features at their full. You can configure a DHCP server for small to medium scale organizations by following the steps given below:
(Assuming that you have already installed DHCP Server)
- Log on to the computer on which you want to configure DHCP server. Make sure that you log on to the computer using the account which has administrative privileges.
- Click on Start button.
- From start menu go to Administrative Tools and from the sub-menu click on DHCP.
- 4. From DHCP snap-in right-click on Fully Qualified Domain Name (FQDN) of your computer (Pctips-3000.testdomain.com in this case) and from the context menu select New Scope.
- On Welcome to the New Scope Wizard page click on Next button.
- On the Scope Name page type the name of the new scope along with its description in respective fields and click on Next button.
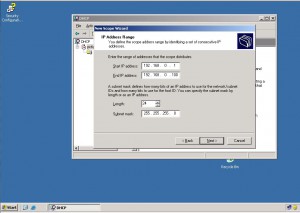
- In IP Address Range page enter start and end IP addresses in their respective fields (192.168.0.1 – 192.168.0.100 for example) and provide subnet mask either in slash notation (/24 for example) or in dotted decimal notation (255.255.255.0 for example) and click on Next button.
- On Add Exclusion Range page click on Next button leaving everything default.
- On Lease Duration page leave everything default and click on Next button. Alternatively you can reduce or increase the lease duration as per your requirements before clicking on Next button.
- On Configure DHCP Options page ensure that Yes I want to configure these options now radio button is selected and click on Next button.
- On Router (Default Gateway) page provide the IP address of the default gateway if you have any. If your network does not have default gateway leave everything blank and click on Next button.
- On Domain Name and DNS Servers page in the Parent domain field enter the name of your domain which is testdomain.com in this case in the Server Name field type the name of the server that is playing the role of DNS server in your network (pctips-3000 in this case) and click on Resolve button. If your DNS configuration is correct the IP address of your DNS server will automatically be resolved. After this click on Add button to add the IP address to the list and click on Next button. (Note: This option is only applicable if you are in domain environment. In workgroup environment this page has no use)
- On Wins Servers page leave everything blank and click on Next button to proceed.
- On Activate Scope page ensure that Yes I want to activate this scope now radio button is selected and click on Next button to activate the scope. (Without activating a scope DHCP server would not provide addresses to the client machines).
- On Completing a New Scope Wizard page click on Finish button to create and activate the new scope.

Additional Info:
In domain environment if you want to use DHCP server you need to authorize it with the Active Directory services before it starts providing addresses to the client computers.