How to Create Virtual Machines in Microsoft Virtual PC after Installation on Windows 7?
Microsoft Virtual PC is in the market since quite a long time. It is a software application which enables a user to install an operating system into another operating system. This means that you can create a virtual computer using Microsoft Virtual PC console and can install Windows XP in Windows 7 and vice versa and can use both the operating systems simultaneously. Although there are many other virtualization software applications available in the market but Virtual PC is the product which is developed by Microsoft and therefore it is quite easy to install configure and integrate with any operating system of Microsoft platform. In order to install Virtual PC you need to download this free application from the Microsoft's official website. The latest version of Microsoft Virtual PC is Microsoft Virtual PC 2007 SP1 which is of approximately 31 MB in size. Once downloaded and installed you can follow the below instructions to create a new virtual machine in Microsoft Virtual PC which is installed on Windows 7.
- After installation when you will run Microsoft Virtual PC for the first time you will get Welcome to New Virtual Machine Wizard page. Here click on Next button.
- On the next page make sure that Create a Virtual Machine radio button is selected and click on Next button.
- On Virtual Machine Name and Location page browse for the appropriate location where you want to save your virtual machine specify a name for your virtual computer and click on Next button. This is Virtual Machine Configuration (.vmc) file.
- On the Operating System page from the drop-down list select the operating system that you want to install on this virtual computer and click on Next button.
- On Memory page you can either assign the amount of RAM which will be available for this virtual computer or you can leave the settings as default and click on Next button. Note: The amount of memory that you will assign to this virtual machine will be shared from the physical RAM present on your computer. For example if you have 2 GB of RAM attached with your physical computer then you can assign 1 GB of RAM to your virtual computer. When the virtual computer will start 1 GB of RAM from your physical memory will be shared with the virtual machine.
- On Virtual Hard Disk Options page select A New Virtual Hard Disk radio button and click on Next button.
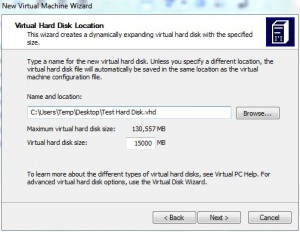
- On Virtual Hard Disk Location page browse for the appropriate location where you want to store the virtual hard disk (.vhd) for virtual computer. If you leave the page intact the default location will be the location where you saved your virtual machine configuration (.vmc) file. On this page you can also specify the maximum size of the virtual hard disk which you are creating. Select appropriate options as per your choice and click on Next button.
- On Completing the New Virtual Machine Wizard page click on Finish to create the virtual machine.
