How to Manage Automatic Updates in Windows 7?
Automatic updates are by default enabled in Windows 7. As soon as a Windows 7 connects to the Internet Windows 7 Automatic Updates feature communicates with Microsoft's update site and looks for recent available updates. As soon as Windows 7 finds new update it downloads and installs them in order to make the computer even securer. In production environments where security is a major concern administrators may not want to modify this default configuration as this setting makes Windows 7 computer secure. However in home environments this configuration might sometimes reduce the processing speed of the computer which might result in decreased performance. Also it is not necessary for home users to download each and every security update which is available on Microsoft’s official website. As a home user if you want to receive the notifications of updates and want your Windows 7 computer to ask you before downloading and/or installing any of them you need to follow the steps given below:
- Logon to the computer with administrator account.
- Click on Start button.
- From the start menu go to Control Panel and from the opened window click on System and Security category link.
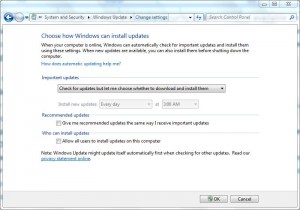
- On the opened page click on Windows Update category link and on the next page in the left bar click on Change settings link.
- On Choose how Windows can install updates page on Important updates drop-down list select Check for updates but let me choose whether to download and install them and click on Ok button to accept and confirm your selection.
- Close all opened windows.
