How to Manage Availability of Printer on a Windows 7 Computer?
In Windows 7 when a printer is installed by default it is available for all users for 24 hours a day. This means that users can use the printer any time they want as far as the printer is powered on and attached to the computer. For home environment this configuration might be quite ideal however in complex network scenarios or in production environment administrators may want to restrict users from using a shared printer during odd hours. Administrators can do so by making the printers available at specific time after which the printer will become unavailable for the users. This configuration can be done by following the steps given below:
- Log on to the computer with administrator account.
- Click on Start button.
- From the start menu go to Devices and Printers.
- From the opened window right click on the icon of the printer for which you want to specify time availability and from the menu click on Printer Properties.
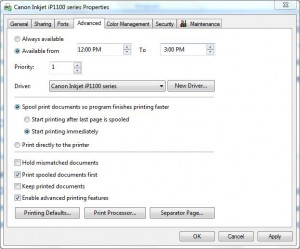
- On the Properties page go to Advanced tab and select Available from radio button.
- In the two text boxes specify the time duration between which you want to make this printer available and click on Ok button to confirm you selection. Users will only be able to use this printer during specified hours.
- Close the opened window.
