How to Manage Data Execution Prevention Feature on a Windows 7 Computer?
Data Execution Prevention is the feature which prevents malicious applications from getting loaded into the memory and corrupting the system files. By default this feature is turned on in order to make the computer system securer. However in some cases the users may install third-party applications codes of which are not readable by Microsoft Windows. When this is the case Data Execution Prevention feature stops those applications to run hence preventing users from using that particular application. To eliminate this problem administrators may want DEP to overlook the codes of these applications and allow them to get executed. Administrators can easily do this by following the steps given below:
- Logon on the Windows 7 computer with administrator account.
- Click on Start button.
- From the start menu right click on Computer and from the menu select Properties.
- On View basic information about your computer page in the left bar click on Advanced system settings link.
- On the opened box make sure that you are on Advanced tab and under Performance section click on Settings button.
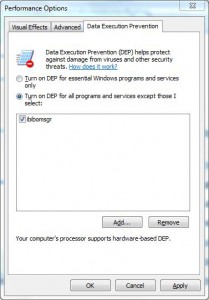
- On Performance Options page go to Data Execution Prevention tab and select Turn on DEP for all programs and services except those I select radio button.
- Click on Add button to add the program or programs that you find incompatible with DEP to create an exception list and click on Ok button.
- Close all opened Windows.
