Manage GNS3 Devices with Command Line Interface (CLI)
Many IT administrators and Cisco students love to work with command line interfaces. The reason behind this is that everyone knows that the command line interface is considered and it really is one of the most powerful tools to automate any process. Also as mentioned earlier the base of GNS3 is Dynamips which actually worked on command line users can still use CLI to send commands to the virtual devices created in GNS3. Although every virtual device in GNS3 can be configured using its own individual console that can be initated easily in order to manage GNS3 application and the virtual devices created in the software GNS3 also provides its own console in which users can type commands. The console is available in the pane located right below the center screen. Simple start and stop commands can also be used to start and stop virtual devices in GNS3. Just to demonstrate if you want to start R1 and R2 routers in a sample project you can use start (case sensetive) command followed by the name of the device (case sensetive) in order to do so. Step-by-step process to this is given below:
-
Logon to the Windows.
-
Open GNS3 by double-clicking on its icon available on the desktop.
-
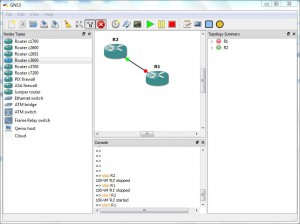
On the opened console either create a new project or load an existing one which has at least two devices connected to each other.
-
In the lower area of the center pane in the Console press enter key twice or thrice to make sure that the application is ready to accept commands from you and type: start R1 _<_Press Enter Key> start R2
-
To stop both devices type: stop R1 _<_Press Enter Key> stop R2

Note:
More commands can be found online or by typing ‘?’ (Question Mark) in the Console pane.