Modifying Default Projects Save Locations in GNS3
When saving configurations and topologies in GNS3 there are few additional steps which are required in order to get the things done in a managed way. You need to modify the default save location of the projects and related files so that you can protect them in case of disasters. You can configure and save the settings mentioned above by following the steps given below:
-
Logon to the computer and open GNS3 console box.
-
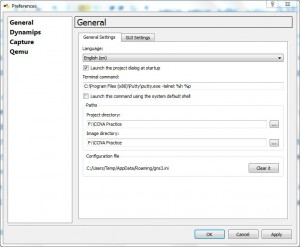
From Edit menu go to Preferences option and on the opened box make sure that you are on General window.
-
Under Project directory section browse through and locate the appropriate directory to which all the project files will be saved. You are advised to use the directory on any drive other than C: in order to protect the saved projects from any disaster.
-
Under Image directly section specify the default path where IOS images involved in the projects will be saved. Normally and as recommended save locations for projects and images should be the same.
-
From the left pane select Dynamips and from the right pane under Working directory browse for and locate the same directory as above.
-
Again from left pane select Capture and from the right pane under Working directory for capture file browse for and locate the folder.
-
Do the same for Qemu section.
-
Once done click on Ok button to save the changes.
