Movies in Windows Media Center Media Library in Windows 7
When Windows 7 is first installed on a computer Windows Media Center is automatically installed which provides almost every multimedia feature that users can think of. Because of its versatile nature the application is capable of playing music videos slideshows etc. Moreover it allows users to create playlists for music files and video clips. Creation of slideshows is also not a big deal for this application and before creating any slideshow users can also modify the images if they want. The focus of this section is on the creation of media library where users can place movie files and can gain instantaneous access to them whenever they need. With the help of easy-to-go wizard offered by Windows Media Center users can place video files at a central location from where they can be played within no time. As a Windows 7 user and Windows Media Center lover if you want to place some movie files in media library you are required to follow the steps given below:
-
Logon to Windows 7 computer.
-
At the bottom of start menu in search box type Windows Media Center and press enter key.
-
On the opened application interface scroll down to Tasks and click on settings.
-
On next window click on Media Libraries option and from the available list on next window click on Movies radio button to select.
-
Click on Next button when done.
-
On Movies page click on Add folders to the library radio button to select and click on Next button.
-
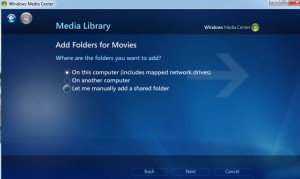
On Add Folders for Movies page select On this computer (includes mapped network drives) radio button and click on Next button.
-
On next window choose appropriate folder(s) and click on Next button.
-
On Confirm Changes page choose Yes use these locations radio button under Are you finished making changes? section and finally click on Finish button to start the process.
