Provide an Alternative IP Address to NICs in Windows 7
When Windows 7 is installed by default it is configured to obtain the IP address automatically that is from the DHCP server which can be available anywhere in the network. This default configuration is quite helpful for the administrators as they need not to move to every computer to type the IP addresses manually. However there may be times when DHCP server is not available because of any reason and in these cases computers may get self-generated IP addresses from Automatic Private IP Addressing (APIPA) feature of the operating system which has the default IP range of 169.254.0.0 with the subnet mask of 255.255.0.0. This range of addresses might not be suitable for the computers used in production environments as with this IP address scheme they cannot communicate with the servers which might be assigned with different range of IP address range (either by DHCP server or manually). In order to avoid this situation administrators can provide alternative IP addresses to the computers which can be used by them in case of unavailability of DHCP server. As an administrator in such scenario if you want to assign an alternative IP address to the computer you are required to follow the steps given below:
-
Logon to Windows 7 computer with administrator account.
-
In search box at the bottom of start menu type NCPA.CPL command and press enter key.
-
Right click on the network interface card that is connected to the network and from the available menu click on Properties.
-
On the opened box double-click on Internet Protocol Version 4 (TCP/IPv4) from the available list.
-
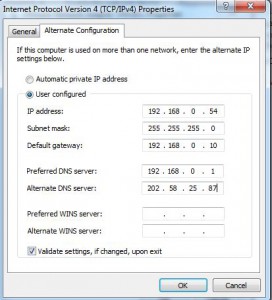
On the appeared box go to Alternate Configuration tab.
-
Click on User configuredradio button to select and populate the desired fields with appropriate values.
-
Once done click on Ok buttons on all the opened boxes to allow the changes to take effect.
