Release and Renew IP Address in Windows 7
Whether Windows 7 computer is kept in home or production environment it is very common that the operating system gets an IP address through DHCP server. In production environments DHCP server can be a dedicated computer which is precisely configured to serve the purpose where as in home environments the Internet modem connected to a computer works as a DHCP server to the local computers. Since Internet modem connected to the computer works as DHCP server it provides an IP address automatically to it which helps computer to connect to the Internet easily. Since this IP address is dynamically assigned to the computer there are times when users experience connectivity problems. When this is the case users can release the IP address which means that the computers will not have any IP it has and the one which is assigned will be surrendered back to the DHCP server. After releasing the IP address they can request for a new one from the DHCP server which technically is known as renewing the IP address. As a Windows 7 user if you want to do so you are required to follow the steps given as below:
-
Logon to the Windows 7 computer with the account that has elevated privileges.
-
Click on Start button and then click on All Programs.
-
From the available list click on accessories container and right click on Command Prompt to get the menu.
-
From the available options click on Run as administrator and click on Yes button on User Account Control confirmation box.
-
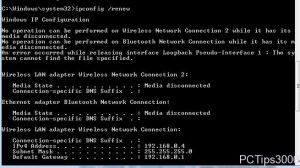
On the opened command window type IPCONFIG /RELEASE (to release the already assigned IP address) and then type IPCONFIG /RENEW(to request for a new IP address from DHCP server).
-
Close command window once you are done.
