Create and/or Add Virtual Hard Disk to VMware Workstation VMs
During the process of creation of virtual machines administrators mostly take proactive approach by creating virtual hard disks of large sizes. This ensures that even with frequent and regular use of virtual machines virtual machines would not run out of disk space hence would never decrease their working efficiencies and performances. However sometimes because of unexpected upgrades or modifications in network infrastructure administrators feel that the virtual machines are running at low disk spaces. In these cases administrators may want to add additional virtual hard disks in order to maintain the efficiency of virtual machines. As a VMware administrator you can create and add additional virtual hard disks to the virtual machines by following the steps given below:
-
Open VMware workstation console window and right click on the virtual machine to which you want to add an additional hard disk.
-
From the appeared menu click on Settings and from Virtual Machine Settings box click on Add button.
-
On Add Hardware Wizard box click on Hard Disk and click on Next button.
-
On Select a Disk page make sure that Create a new virtual disk radio button is selected and click on Next button.
-
On the appeared page choose the appropriate disk type (IDE or SCSI) and click on Next button.
-
On the next page specify the desired size of virtual hard disk and click on Next button.
-
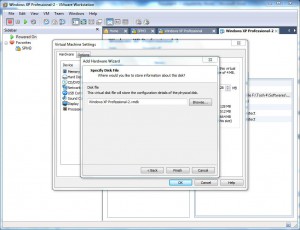
On Specify Disk File page specify the name and save location of the virtual hard disk by clicking on Browse button and click on Finish button to create and add a new virtual hard disk to the selected virtual machine.