How to Assign Static or Dynamic IP Address on Windows 7 Computer with a Single Touch?
IP addresses can instantaneously be assigned to a Windows 7 computer using batch files. This means that you need to create appropriate batch files in order to assign both static or dynamic IP addresses to the computer. Below are the steps using which you will be able to create a batch file with .bat extension which when executed will assign a specified IP address to the machine. Also you will learn to create another batch file which will configure your Windows 7 computer to obtain IP address automatically from a DHCP server.
- Click on Start button.
- At the bottom of start menu search box type NOTEPAD and press Enter key.
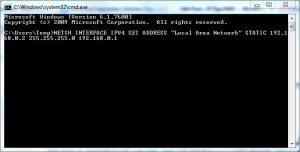
- In the notepad type NETSH INTERFACE IPV4 SET ADDRESS "Local Area Connection" STATIC 192.168.0.2 255.255.255.0 192.168.0.1 command where 192.168.0.2 is the static IP address 255.255.255.0 is the subnet mask and 192.168.0.1 is the default gatway for the computer. IP address given above is just an example and you can use any IP address as per your choice.
- Once you are done you need to save this notepad file with .bat extension. To do so press ctrl+s keys together and from the opened box specify the name of the file with .bat extension between double quotes. For example "IPCH.BAT"
- To run this file you need to right click on it and from the context menu select Run As Administrator.
- To configure your Windows 7 computer to obtain IP address automatically from DHCP server you need to create another batch file containing NETSH INTERFACE IPV4 SET ADDRESS NAME="Local Area Connection" SOURCE=DHCP command.

Best Practices:
You can use this batch file to assign IP address easily and quickly. In case you need to change IP address you can modify this .bat file by right-clicking on it and selecting Edit. This practice will save you couple of clicks and lots of time.