How to Create and Define Roaming User Profiles for Domain Users in Windows Server 2003?
Roaming user profiles are the profiles of domain users which are saved on a file server located anywhere in the domain environment. With the help of roaming profiles domain users are able to get their desktop environment on every computer which is client of a domain controller. As every user has different desktop settings and environment he might not feel comfortable with the different desktop ambiance. In order to solve this problem roaming user profiles are configured for domain users. Below are the steps using which you will be able to configure roaming profiles for users in the domain environment right from the scratch.
Note: Configuration of Roaming User Profiles involves 2 processes: Sharing a Folder and Configuring Domain Users’ Profile page.
Process 1: Sharing a Folder
- Log on to the domain controller with the credentials of Domain Administrator / Enterprise Administrator. (For testing purpose domain controller is used as a file server and C: is used to store roaming profiles. However in production environment it is recommended that you use a separate machine (preferably a virtual machine) as a dedicated file server and any drive other than C: to store roaming profiles of domain users.
- Create a folder on drive C: and name it as RoamingProfiles. (You can give any name to this folder)
- To Share RoamingProfiles folder right-click on it and from the context menu select Properties.
- On the Properties page go to Sharing tab and select Share this folder radio button.
- Leave the default share name intact and click on Permissions button.
- Make sure that in Share Permissions window under Groups or user names frame Everyone group is selected and in Permissions to Everyone frame under Allow column check the checkbox opposite to Full Control option.
- Click on Ok button on all windows to accept and confirm your settings.
Process 2: Configuring Domain Users’ Profile Page.
- Click on Start button and go to Administrative Tools.
- From Administrative Tools sub-menu click on Active Directory Users and Computers snap-in.
- When opened from the left pane expand the domain name (TESTDOMAIN.COM in this case) and from the list select Users container.
- From the right pane right click on the user name for which you want to configure roaming profile and select Properties. You can also select multiple users by pressing Ctrl key while selecting users. This will enable you to configure roaming user profile for multiple users in a single session.
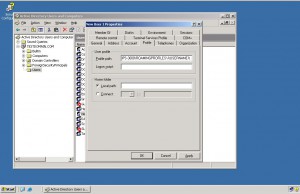
- In the Properties window go to Profile tab.
- In the Profile path text box type the Universal Naming Convention (UNC) path for the shared folder followed by the variable. In this example it would be \PCTIPS-3000ROAMINGPROFILES%USERNAME% where PCTIPS-3000 is the computer name %USERNAME% is the variable which will be replaced with the name of the user account automatically and \ is the UNC symbol.
- Once done with the above configuration click on Ok button to accept and confirm the settings.

Next time when the user will log on to the domain his profile will be saved in a sub folder which will be created under RoamingProfiles shared folder. Name of the sub folder will be the name of the user for whom roaming profile is configured. Every time the user will use a domain client computer to log on his profile will be downloaded for this sub folder and will be saved back in this folder when the user will log off.