How to Manage Undo Disks Feature in Virtual PC?
Undo Disks feature is used to temporary reflect the changes made by a user on any guest operating system installed in a virtual machine. With the help of Undo Disks when a user shuts down guest operating system Virtual PC asks if the user wants to permanently commit the changes to the virtual machine. If he chooses to commit the changes all the modifications are permanently merged with the virtual hard disk (.VHD) file. Otherwise the changes are discarded and all recent configuration/modifications made in guest operating system are rolled back to the last committed state. In order to enable Undo Disks feature you need to follow the below steps.
- On the Virtual PC Console box select the virtual machine on which you want to enable Undo Disks and click on Settings button.
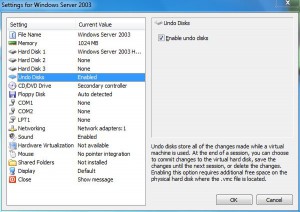
- On the Settings window in the left pane click on Undo Disks and from the right pane check Enable undo disks check box.
- Click on Ok button to accept and confirm your selection.

Benefit and Usage:
Undo Disks is useful when you are either practicing on any configuration or you are trying to configure something extremely complex in production environment and have messed up everything. In either case if you want entire configuration to roll back to its previous state you can tell Virtual PC not to commit changes while shutting down guest operating system. In this way you will get the unchanged configuration back.