How to Create and Use Virtual Hard Disk in Windows 7?
Windows 7 has a brand new feature of creating Virtual Hard Disk (VHD) that was not available with any other versions of Windows operating systems earlier. Also this feature allows you to attach this VHD file and use it as a data storage device. Moreover in complex local computer or network configurations these VHDs are used to install a full fledged Windows 7 operating system which then becomes quite handy for the administrators to deploy it at remote locations such as branch offices etc. This means that with Windows 7 in VHD they can copy the VHD file to their USB flash drives or can burn the entire VHD file on a single DVD and can parcel it to any branch office. Alternatively administrators can also use VHD files to take backup of a baseline operating system which can be restored in case of disasters. To create VHD files and attach them to your Windows 7 computer you need to follow the instructions given below:
- Click on Start button.
- From start menu right-click on Computer and click on Manage.
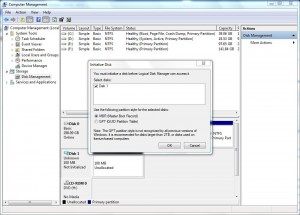
- In the Computer Management snap-in from the left pane right-click on Disk Management and select Create VHD.
- In Create and Attach Virtual Hard Disk box browse to the location where you want to store this VHD file.
- In the Virtual Hard Disk Size text box specify the amount of space you want to assign for your Virtual Hard Disk and select the unit from the drop down list. (Recommended is GB)
- Leave everything else as default and click on Ok button.
- When the process will be completed you will find another hard disk attached in Disk Management snap-in as shown in the snapshot below:
- Once completed you can use this Virtual Hard Disk as any other physical hard disk drive attached to your computer.
- If you want to detach this VHD you can do so by right-clicking on the attached VHD and selecting Detach VHD.
