How to Create System Repair Disc in Windows 7?
In Windows 7 system repair disc is created so that if ever Windows 7 fails to boot or gets corrupted system repair disc can be used to repair Windows 7 computer and bring it back to running position as before. Below are the instructions which can be followed to create a system repair disk in Windows 7.
-
Click on Start button.
-
From the menu select Control Panel.
-
Under System and Security category click on Backup Your Computer link.
-
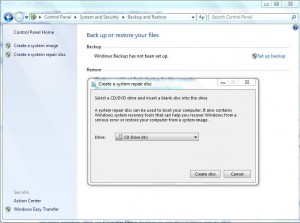
on the next window in the left pane click on Create a System Repair Disc link.
-
Make sure that a blank DVD is present in the DVD writer of your computer and on next window click on Create Disc button to create system repair disk.

This system repair disc can be used to start your computer system allowing it to boot from it. Once the system is booted using system repair disc a previously created system image file can then be located in order to restore the computer to its previous state. Also this system repair disc contains a few recovery tools which can be used to recover your Windows 7 computer in case any critical error occurs in the machine.
Note:
In order to use system repair disc you need to create an image of your Windows 7 computer in advance.