How to Disable Backup Feature in Windows 7?
Backup plays an important role in every network setup. Without backup the organizations are always considered on risks. There are numerous strategies which are planned for backup and restoration process and administrators are provided special training for the purpose. However in some cases administrators would not want the backup feature to the left enabled at all. The reason behind this can be internal security threat or to provide extreme security to the sensitive data. When this is the case administrators can follow the steps given below in order to disable the backup feature on a Windows 7 computer:
- Logon to the computer with administrator account.
- Click on Start button.
- At the bottom of start menu in search box type gpedit.mcs and press enter key.
- On Local Group Policy Editor snap-in under Computer Configuration expand Administrative Templates and expand Windows Components.
- Expand Backup and click on Client.
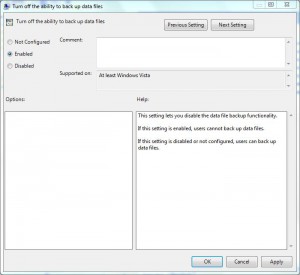
- In the right pane double click on Turn off the ability to back up data files and in the opened window select Enabled radio button.
- Click on Ok button to accept and confirm your configuration and close Local Group Policy Editor snap-in.
- Open Command Prompt and the command window type gpupdate /force to update your computer with latest settings.
- Close Command Prompt.
