How to Enable BitLocker Without TPM Chip in Windows 7?
By default Windows 7 allows an administrator to enable BitLocker only when Trusted Platform Module (TPM) chip is present and is enabled in the bios settings of the computer. However this feature of Windows 7 can be modified through Group Policies and BitLocker can still be enabled without TPM support. In order to do so administrators need to follow the below instructions:
- Click on "Start" button.
- At the bottom of start menu in search box type "gpedit.msc".
- In the "Local Computer Policy" snap-in under "Computer Configuration" expand "Administrative Templates".
- Expand "Windows Companies".
- Expand "BitLocker Drive Encryption".
- Select "Operating System Drives".
- In the right pane double click on "Require additional authentication at startup ".
- In the opened window select "Enabled" radio button.
- Under "Options" frame in the left side of the window check "Allow BitLocker without a Compatible TPM" checkbox.
- From the below four drop down lists select "Do not allow TPM" in "Configure TPM Startup" "Do not allow startup PIN with TPM" in "Configure TPM startup PIN" "Do not allow startup key with TPM" in "Configure TPM startup key" and "Allow startup key and PIN with TPM" in "Configure TPM startup key and PIN".
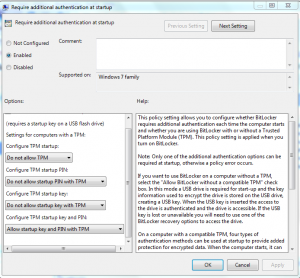
- Click on "Ok" button to accept and confirm your selection.
- Close "Local Computer Policy" snap-in.
- Click on "Start" button and go to "All Programs".
- From the list select "Accessories".
- Right-click on "Command Prompt" and select "Run as Administrator".
- In the "User Account Control" dialog box click "Ok" button to allow Windows to use your administrative credentials to run the program.
- In the "Administrator: Command Prompt" window type "gpupdate /force" (without quotes) and press enter key.

Once you are done with this this means that now you have configured your computer to enable BitLocker without TPM support. Now you need to enable BitLocker Drive Encryption on the operating system drive which is also known as "System Drive". To enable BitLocker on system drive you need to follow the below instructions:
- Click on "Start" button.
- From the menu click on "Control Panel".
- In the Control Panel page select "System and Security" link.
- In the right pane click on "BitLocker Drive Encryption" link.
- In the opened window click on "Turn on the Locker" link opposite to C:.
- In "Set BitLocker startup preferences" click on "Require a startup key at every startup" link.
- On the next page Windows 7 will ask you to insert a blank USB flash drive where it can store the key. This USB drive will be required every time your computer starts.
- On "How do you want to store your recovery key?" page click on "Save the recovery key to a USB flash drive" link.
- On the "Save a Recovery Key to a USB Drive" box ensure that USB flash drive that you inserted is selected and click on "Save" button.
- On the previous page click on "Next".
- On the confirmation box click on "Continue" button to start encryption process.
You can test this configuration by restarting your computer and setting and allowing it to read contents from USB drive at startup.
BitLocker is mostly used for security purposes when you need to encrypt the entire hard disk drive. This allows a person to add an extra layer of security to the desktop or laptop PCs. When this type of drive encryption is enabled even if a thief steals the laptop or desktop he will still not be able to read or extract any information without the PIN and the USB flash drive which is required at every startup.