How to Establish a New Ad-hoc Wireless Connection on Windows 7?
Wireless connections have 2 topologies and you can implement any one as per your requirements. The first topology is known as Infrastructure in which there is one Wireless Access Point (WAP) and all the wireless clients that communicate with each other use this Wireless Access Point as their central device. This means that every communication that takes place is via WAP. This scenario is best suited in production environments where there are several wireless clients and they need to connect with each other. However in home environments where there are one or two laptop PCs which are to be connected with each other it would not the feasible to purchase Wireless Access Point. On the contrary it is advisable that in these cases people should use Ad-hoc topologies to save money and time. As a home user you can establish an ad hoc wireless connection by following the steps given below:
- Logon to the computer with administrator account.
- Click on Start button.
- From the start menu go to Control Panel and from the opened window click on Network and Internet category link.
- The opened page click on Network and Sharing Centre category link and on View your basic network information and set up connections page in the left bar click on Manage wireless networks link.
- On Manage wireless networks that use (Wireless Network Connection) page click on Add button.
- On Manually connect to a wireless network window select Create an ad hoc network category.
- On Set up a wireless ad hoc network page click on Next button.
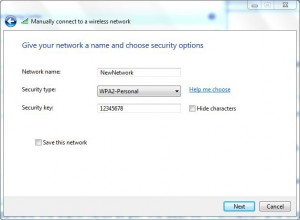
- On the next page populate the blank fields as per the desired information and click on Next button. (Note: If you are trying to join an existing ad hoc network you need to populate these fields with information of that ad hoc wireless setup which may include SSID and pre-shared key).
- Wait for the process to complete and on the confirmation window click on Close button.
