How to Enable or Disable Windows Firewall in Windows 7?
For those who don’t know Windows Firewall is a built-in application that ships along with Windows and protects your computer from any malicious attacks. When a person tries to enter your computer it is firewall that prevents him from doing so. In other words Windows Firewall works as an efficient gatekeeper for the computer that prevents any unknown application or a known application from untrusted source to enter your system until or unless you have specifically allowed it. In medium to large scale organizations where security is a major concern administrators usually rely on third-party firewall solutions and most of them prefer dedicated hardware firewalls whereas in homes or small scale industries Windows Firewall works just fine. It is always recommended that you should NOT turn off the firewall whatsoever the case is. However for testing purposes if you want to disable Windows Firewall you need to follow the steps given below:
- Logon to the computer using administrator account.
- Click on Start button.
- From the start menu go to Control Panel and from the opened window click on System and Security category link.
- On next page click on Windows Firewall category link and on next page from the left bar click on Turn Windows Firewall on or off.
- On Customize settings for each type of network page under Home of work (private) network location settings select Turn off Windows Firewall (not recommended) radio button.
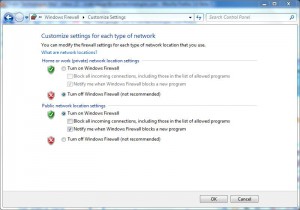
- Once done click on Ok button to accept your configuration and close all windows.
