How to Increase or Decrease Mouse Pointer Speed in Windows 7?
As default Microsoft's strategy when any of its operating system is installed on a computer it provides the optimum configuration which is best suited for an ideal scenario. Same is the case with mouse pointer speed in Windows 7. By default the speed of the pointer is ideal for every user under normal conditions. However users can increase or decrease pointer speeds of their mice when they move it as per their requirements. Scenarios may include production environment desktop publishing etc. Pointer speed configuration is a user specific setting which can be modified by following the steps given below:
- Logon to the Windows 7 computer with the user account on which you want to manage mouse pointer speed.
- Right click on the desktop and from the context menu click on Personalize.
- On Change the visuals and sounds on your computer window in the left side click on Change mouse pointers link.
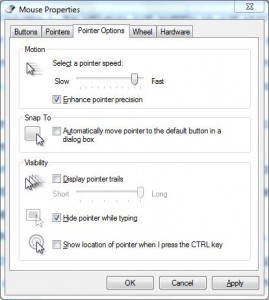
- On Mouse Properties box go to Pointer Options tab and in Motion section move the slider right or left to increase or decrease the pointer speed respectively.
- Once done click on Ok button to accept and confirm your configuration and close all the opened Windows.
