How to Manage Mouse Double-Click Speed in Windows 7?
When Windows 7 is installed it senses a normal double-click speed of the mouse. However in the cases where users are physically challenged mouse double-click speed can be increased or decreased as per the requirements. This means that if mouse double-clicking speed is decreased users can increase the time interval between two subsequent mouse clicks. This makes users work with mouse more comfortably. You can increase or decrease mouse double-click speed by following the steps given below:
- Logon to the computer with the user account on which you want to manage the mouse double-click speed.
- Right click anywhere on the desktop window and from the context menu click on Personalize.
- On Change the visuals and sounds on your computer window in the left hand bar click on Change mouse pointers.
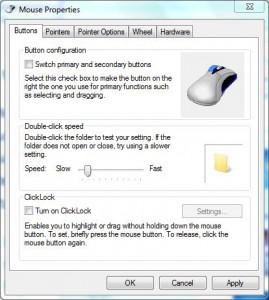
- On Mouse Properties box go to Buttons tab and in Double-click speed section move the slider left or right to decrease or increase the double-click speed respectively. (If you decrease the speed by moving the slider to the left users can increase the time interval between two subsequent mouse clicks. The action will reverse when the slider is moved to the right).
- Once configured click Ok button to confirm your configuration and close the opened Window.
