How to Restrict Users or Groups from Shutting down a Windows 7 Computer?
By default any Microsoft's client operating system allows all users to shut down the computer. This configuration however might not be appropriate in many cases because of security reasons. Therefore in order to restrict users from shutting down the system an administrator of a computer can modify the default configuration by changing the settings in group policies. As an administrator you can configure the above by following the steps given below:
- Logon to the computer with administrator’s account.
- Click on Start button.
- At the bottom of start menu in search box type gpedit.msc command and press enter key.
- On Local Computer Policy snap in under Computer Configuration expand Windows Settings.
- From the list expand Security Settings.
- Expand Local Policies and click on User Rights Assignment.
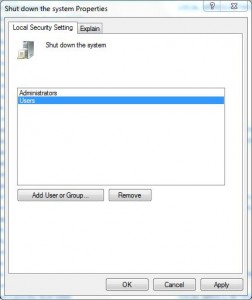
- From the right pane double click on Shut down the system.
- On Shut down the system Properties box click on the name of the user or group you want to restrict and click on Remove button.
- Click on Ok button to confirm your configuration and close Local Group Policy snap-in.
- Open Command Prompt and in the command window type gpupdate /force command to update the computer with new group policy settings.
- Close command window.

More Info:
On Microsoft’s network operating systems like Windows Server 2003 or Windows Server 2008 users by default are not allowed to shut down the system. Therefore in order to allow users to shut down the computer in network operating systems administrators need to reverse the above process.