How to Specify When Windows 7 Checks for Updates?
In production environment where there are several computers connected to a single local area network and share a common Internet connection Windows Server Update Services server is configured to make latest updates available to the clients on the local intranet. Since working off-line expedites every task administrators may also want to decrease the time interval between two subsequent update searches that Windows 7 computers make. This ensures that client computers are always up-to-date with latest updates and patches and are secured. As an administrator you can configure this by following the steps given below:
- Logon to the computer using administrator account.
- Click on Start button.
- At the bottom of start menu in search box type gpedit.msc and press enter key.
- From the Local Group Policy Editor snap-in under Computer Configuration expand Administrative Templates and then expand Windows Components.
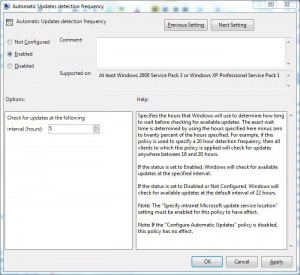
- From the expanded list select Windows Update and from the right pane double click on Automatic Updates detection frequency.
- From the opened box select Enabled radio button and under Options section in Interval hours textbox specify the time interval.
- Click on Ok button to accept and confirm you selection and close Local Group Policy Editor snap-in.
- Open Command Prompt.
- In command window type gpupdate /force and press enter key to update your computer with latest settings.
- Close Command Prompt
