Map Virtual Router with Physical LAN Card in GNS3
As GNS3 provides a complete virtualized solution as far as routing and switching of Cisco devices is concerned the application can also be mapped with the physical LAN card and can be configured to communicate with the physical computer. This further means that virtual routers created in GNS3 can communicate with the entire network infrastructure and can be used as physical routers in many cases. Using virtual routers as a replacement of physical ones is not at all recommended though. However as the student if you want to make virtual routers communicate with the physical network infrastructure you need to follow the steps given below:
-
Logon to the computer with administrator privileges.
-
Open GNS3 console window by double-clicking on the icon available on the desktop.
-
Mount appropriate IOS images in GNS3 console.
-
To the virtual routers to the physical LAN card drag club single from the left pane and drop it into the center area.
-
Right click on the cloud and from the appeared menu click on Configure.
-
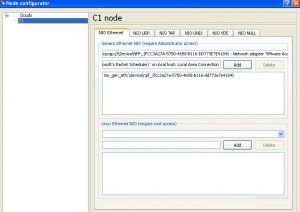
On Node Configurator page click on the name of the node from the left pane C1 in this case and from the right pane make sure that you are on NIO Ethernet tab.
-
You will be displayed with the physical LAN card ID under Generic Ethernet NIO (require Administrator access) section.
-
Click on Add button to add it and click on Ok button to make the changes permanent.
