Configure Touchpad of Laptop PCs in Windows 7
In today's laptop PCs era everyone has one or two laptop PCs and in more than 95% of them Windows 7 is installed. Installation of Windows 7 on a laptop PC can be either from vendor's end or users can install the operating system on their own if they want to upgrade it. Whatsoever the case is Windows 7 is now taking a lead as far as Windows based operating systems on a laptop PCs are concerned. Like customizations of controls are available in desktop PCs Windows 7 offers same kinds of controls for laptop computers as well. Case of mouse buttons and configurations of mouse pointers is not left alone in this regard. In other words touchpad of laptop PCs can be configured in a similar way as mouse settings can be done in desktop computers. Windows 7 is highly flexible while configuring these to provide the users as much friendly interface as possible. As a Windows 7 user if you want to configure touchpad settings on laptop PCs similar to mouse settings of desktop computers you are required to follow the steps given below:
-
Logon to Windows 7 computer with the account on which you want to configure touchpad settings.
-
From the start menu list go to Control Panel.
-
From View by list in the Control Panel window choose Large icons.
-
From the now available category click on Mouse.
-
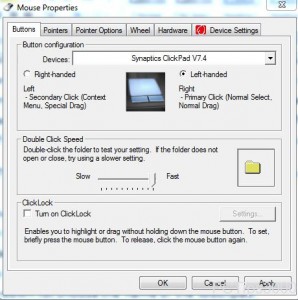
On Mouse Properties box make sure that you are on Buttons tab.
-
From Devices drop-down list choose the name of the touchpad.
-
Configure the appropriate settings as required for example Right-handed or Left-handed double-clicking speed etc.
-
Once you are done with the configurations click on Ok button to save the changes and close all the opened Windows and boxes.

Previous: Change Windows 7 Desktop Wallpaper