Connecting GNS3 with VPCS
Once configuration of VPCS is done now it is time to make appropriate changes in GNS3 application. This means that in the router emulator you need to add a cloud and map it to the already running Virtual PC Simulator. The process of mapping VPCS and GNS3 is simple as only the port numbers are to be swapped in GNS3 application. This means that after you have placed a cloud in the central area of GNS3 you need to configure the local and remote port numbers on the cloud according to default or manually configured port numbers in Virtual PC Simulator application. While configuring you need to keep in mind that the remote port number of simulated virtual PC will be used as local port of the cloud and the local port number of simulated virtual PC will be used as the remote port of the cloud. If you want to map GNS3 with simulated virtual PC you need to follow the steps given below:
-
Log on to the Windows and double click on the icon of GNS3 to open the application.
-
On the console window from the left pane drag the icon of Cloud (you can use Computer icon as well if you have used Symbol Manager to modify the symbol of cloud as a computer) to the central area.
-
Right click on C1 cloud and from the available menu click on Configure option.
-
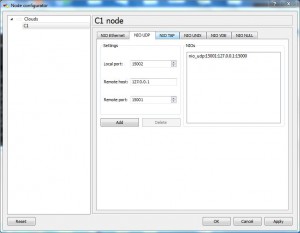
On Node configurator box from the left pane click on the name of the node which in this case will be C1 and from the right pane go to NIO UDP tab.
-
Type 15001 and 15000 in Local port and Remote port text boxes respectively (assuming that 15001 is remote port number and 15000 is local port number on a simulated virtual machine in VPCS.
-
Type 127.0.0.1 in Remote host text box and finally click on Add button.
-
Finally click on Ok button to save your settings.
