How to Disable Task Manager in Windows 7?
When a Windows 7 computer is used in home environment its default configuration is mostly considered as ideal. However when this client operating system is used in production environment administrators would want to make it as secure as possible. To add another layer of security on Windows 7 computer administrators should disable Task Manager for all users. If you are an administrator you can disable Task Manager by following the steps given below:
- Logon to the computer with administrator account.
- Click on Start button.
- At the bottom of start menu in search box type gpedit.msc command and press enter key.
- On the opened Local Group Policy Editor snap-in under User Configuration expand Administrative Templates and then expand System.
- Click on Ctrl+Alt+Del Options and from the right pane double click on Remove Task Manager.
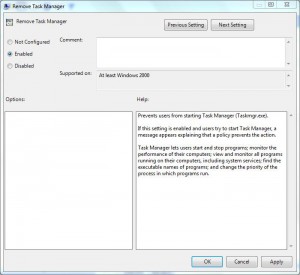
- On the opened box select Enabled radio button and click on Ok button to accept your configuration.
- Close Local Group Policy Editor snap-in and open Command Prompt.
- On the command window type gpupdate /force command to update your current computer configuration with latest settings.
- Close Command Prompt.

More Info:
Sometimes due to virus infections Task Manager automatically gets disabled. When this happens the above process can be reversed in order to re-enable Task Manager. If Task Manager is disabled due to virus infection and in group policy settings its status is Not Configured you need to first disable it and then enable it. Finally you can change the settings back to Not Configured in order to get the default settings of Task Manager back.