How to Disable Windows Defender in Windows 7
Whenever Windows 7 is installed on a bare metal machine that is a clean copy of Windows 7 is installed it's built in protection feature named Windows Defender is automatically installed with and initialized. This small program automatically detects any harmful application or malware that may enter into the system and cause harm. Windows Defender works in the background and detects for the harmful applications in real time. However this application is an integrated program that ships along with Windows 7 its priority is not as high as compared to any full-fledged anti-virus application that users can purchase from the market. Since third-party antivirus applications are precisely developed to protect the computers from harmful and unwanted applications they are considered as highly efficient in this regard. Most of these antivirus applications when installed automatically disable Windows Defender and if in case they fail users can do so manually by following the steps given below:
-
Logon to Windows 7 computer with the account that has elevated privileges.
-
At the bottom of start menu in search box type SERVICES.MSC and press enter key.
-
On the opened window double-click on Windows Defender.
-
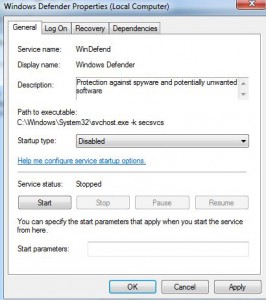
On Windows Defender Properties (Local Computer) box make sure that you are on General tab.
-
From the drop-down list available next to Startup type choose Disabled and click on Okbutton to save the changes.
-
If required restart the computer.
